Recipe feeds 6 normal people or 4 very hungry people
“Pino” (ground beef filling)
Ingredients:
- 500 grams ground beef (low fat is best)
- 3 onions (see note 1)
- 3 cloves of garlic
- A little bit of cooking oil
- Salt and cumin to taste
- Raisins, soaked in hot water
- Olives
- 2 hard-boiled eggs, divide each egg into 4 segments
- 6 small pieces of chicken
Preparation:
- Chop onion and garlic finely.
- Heat a little oil in a frying pan; add the onion and garlic and fry for a few minutes.
- Add the ground beef to the frying pan and cook over low heat until the meat is no longer red. Stir regularly.
- Add salt and cumin to taste. (see Note 2)
- Put the prepared “pino” in an oven proof dish.
- Boil the chicken in water with salt and some herbs such as bay leaves or other herbs you have on hand.
- In your mind, divide the ovenproof dish into desired portions sizes (for instance six if you have six portions for chicken – but you can make each portion smaller or larger as you wish) and within the (imagined boundaries of each) portion place a piece of chicken together with a piece of egg, an olive and some raisins.
- Next – prepare the corn paste.
———
Corn Paste Topping
Ingredients:
- 6 fresh ears of corn or 2 cans of corn (see note 3)
- Several leaves of fresh basil (see note 4)
- Sugar
Preparation:
- Remember to pre-heat the oven to 200 °C (see note 5)
- If using fresh corn, carefully cut the corn from the cob.
- If using cans of corn and the can has a lot of liquid in it, let it drain.
- Put the corn and the basil in a blender and puree the mix.
- If you used fresh corn, you need to put the corn and basil mix in a pan and let it simmer on low heat for a few minutes. You can skip this step if you use canned corn as that corn has already been cooked.
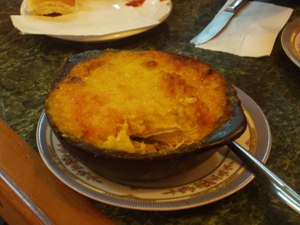
- Place the corn paste on top of the “pino“, chicken, olives, egg and raisins that you previously placed in the ovenproof dish.
- Spread the corn paste evenly to make a pretty cover for the dish. Sprinkle with some sugar to help give it a prettier color after baking.
- Put the dish in the oven and cook till the corn starts to brown on the top and around the edges. Remember that all ingredients have already been fully cooked, so you are really just warming it up and making the flavors mix together.
Notes and Comments:
Note 1 – I am not a fan of a lot of onion so I use about one onion and lots of green onions (spring onions) instead as they have a gentler flavor, but this depends on your own preferences.
Note 2 – Sometimes I also add paprika powder to give the “pino” a nicer color.
Note 3 – The recipe calls for 2 cans of corn. The cans in Chile are much larger than in Norway and I would recommend using at least 4 Norwegian sized cans. I love the corn paste topping so the truth is I usually use even more corn than that, but once you try the recipe you will figure out how much corn you prefer to use. There should be enough corn paste to at least cover the “pino”, chicken, eggs etc…
Note 4 – The taste will be best if you can use fresh basil for this recipe, but I know that may be hard to find in Norway so then you can use the dry basil (basilikum) that they sell in the herb and spice section of the supermarket.
Note 5 – The oven temperature may vary depending on the oven. It should be quite high, but if it starts burning, try a lower temperature such as 180 °C.
General comments: If you do not like the raisins or olives, these can be left out. You can also reduce the amount of garlic if your guests do not care much for garlic. Also, the Chileans will normally have pieces of chicken in this dish but this can also be left out if you prefer a simpler version. The Chilean food is generally not spicy, but if you want to add some “kick” to the dish you can definitely add a little chili powder, but not too much because it would overpower the sweet flavor of the corn.
Posted by: Hild @ 8:32 am
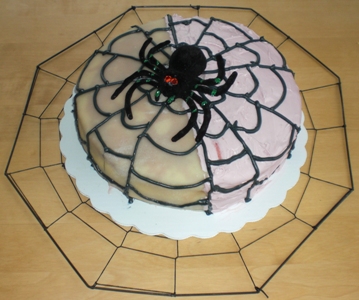
We love blautkake. This yummy Norwegian layer cake can be decorated for any special occasion and we had a Halloween party coming up. For us, a blautkake should have whipped cream filling and a marzipan cover. Hild had the idea that this time she wanted to make a half-and-half cake with a marzipan cover on one half of the cake and a more common (in North America) icing cover on the other half. The other part of the idea was to decorate it with a cobweb pattern and a huge big spider.
Note that “blautkake” translated directly from Norwegian means “soft cake” although Rob prefers to translate it as “soggy cake”. The soggier the better - to a point. Ho-hum.
Sponge Ingredients (for one 20 cm diameter cake with three layers):
- 4 large eggs
- 2 dl sugar
- 1 dl potato flour (I used corn flour and it turned out OK)
- 1 dl plain flour
- 2 teaspoons baking powder
- melted butter to grease the tin
Decorations:
- 2.5 dl whipping cream
- 1 dl Ribena juice (or more for more blood-effect. In Norway we would have used “husholdningssaft”)
- 1.5 dl seedless strawberry jam (or more for more blood-effect)
- 2.5 dl mandarin wedges in fruit juice (or more for more bits-of-brain-effect)
- 100 gr marzipan (200 gr for complete cake cover)
- 2 dl ready-made spreadable icing (or double the amount if you do not plan for a marzipan cover)
- 2 dl icing sugar
- food and icing colouring (yellow and black would be best for our party but we only had red and black)
Directions:
Pre-heat the oven to 200 celsius. Whisk eggs and sugar until it thickens. Carefully fold in a mix of potato flour, flour, and baking powder. Fold for an even mix but as little as possible. Melt butter and grease the tin (or use any other way of greasing the tin). Pour the mix into the tin and place it on the middle oven rack. Bake it for 25-35 minutes until it is ligth brown on the outside and baked through. Leave the cake to cool for a few minutes and remove it from the tin. When the cake has cooled down, cut it into three even layers.
This is when one can try different things to decorate the cake evey time. We prepared our layers like this:
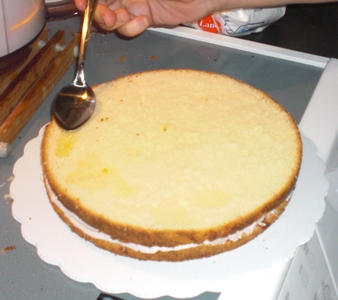
- Douse the bottom layer with Ribena. We should have used more to make the cake look more “bloody” for Halloween. Whip the cream until it thickens. Cover the layer in a mix of some of the whipped cream and strawberry jam.
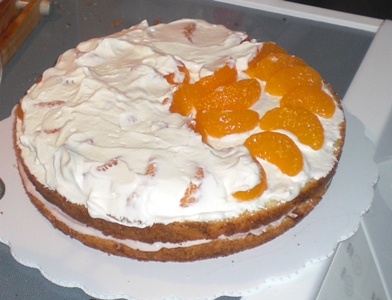
- Put the second layer on top of the cream/jam layer. To make the middle layer moist, douse it with juice from the mandarins. Spread whipped cream on this layer, spread a layer of mandarin wedges and another layer of whipped cream.
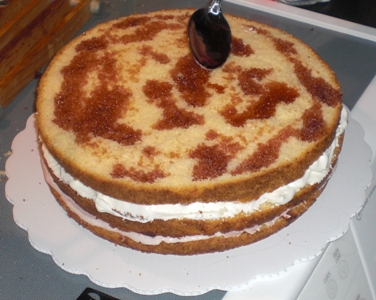
- Put the top cake layer on and douse it with Ribena. Spread strawberry jam over the layer and another layer of whipped cream before covering the cake with marzipan. We only covered half the cake in marzipan. On the other half we spread the ready-made icing (vanilla flavour with some of our own red colouring. If we had had yellow colouring we could have gotten a more fun orange Hallween colour).
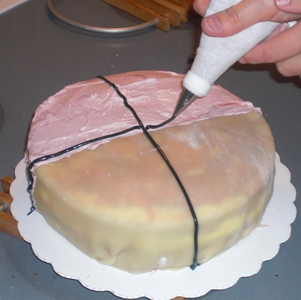
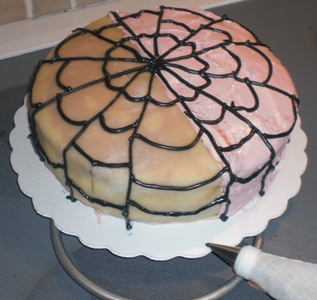
To make the cobweb effect we mixed icing sugar with black food colouring and some water. Note of caution: don’t overdo the colouring unless you want your guests to go home with black mouths and lips! We had planned to find an edible chocolate spider for extra decoration, but we weren’t able to find one. So the one in the final photos below is fake fake fake. The cake was definitely nam nam. Keep in mind that leaving any left-over cake covered in the fridge overnight does NOT make it any less nam nam!
Photos:
1. Dousing the second layer
2. Mandarins in the second layer
3. Dousing the top layer
4. Cobweb icing on marzipan and icing top
5. Finished cobweb icing
6. Spider guarding the cake.
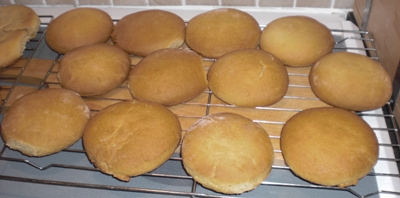
Another recipe from Janet’s (mum’s) collection. 10-øreskaker (with the current exchange rate to Canadian Dollars) translates to 2-cent cakes. This is not the cost of making or buying them anymore! Some may call them a sweet buttermilk scones. But I don’t know quite what to call them in English. Rest assured that they are delicious, and freeze well to be defrosted quickly in the microwave for that sudden urge for something sweet with your cup of tea or coffee or mug of milk.
Ingredients (120 cakes… so I often make half of this)
- 500 grams butter
- 1 litre butter milk
- 500 grams syrup (corn syrup worked well)
- 50 grams ammonium bicarbonate (sometimes sold as “harts horn” or in Norway - “hjortetakksalt”)
- 700 grams sugar
- ca. 1 litre plain flour
Directions
Preheat oven to 220 degrees celsius. Mix milk, melted butter and warm syrup. Add the dry ingredients. Add flour gradually until the dough is firm enough to be rolled with a rolling pin. Use a glass or a large cookie cutter to cut the cakes from the rolled-out dough. We choose a smaller glass to make the cakes more to our preferred snack-size (see photo). Put on baking sheet above the middle of the oven and bake for 7-9 minutes. Leave cakes to cool down. Serve as is or with a bit of butter/spread and maybe even a slice of Jarlsberg cheese brunost (goat cheese sometimes sold in North America as “Skiqueen”) and/or jam. Nam Nam.
Note that we have struggled to find ammonium bicarbonate outside Europe, but yesterday we stumbled across it in one of the Loblaws grocery shops here in Ottawa. It is sold in a small 30 gram plastic container with screw-top lid and our excuse is that it was partially hidden behind a large box of baking soda. In desperation we have in fact tried to make 10-øreskaker using baking soda and baking powder, but they don’t produce that nice fluffy middle, and there is often a not so charming taste of baking soda. Be warned that baking with ammonium bicarbonate does NOT make for a yummy dough to nibble before baking (bummer) - and it makes for smelly fumes in the kitchen so keep your windows open. Also, don’t open the oven door and stick your head too close to check out how they are doing… the fumes are quite unpleasant. Luckily the smell dissipates quickly leaving only delicious fluffy snacks. Enjoy!
Photo 1: Cutting the cakes
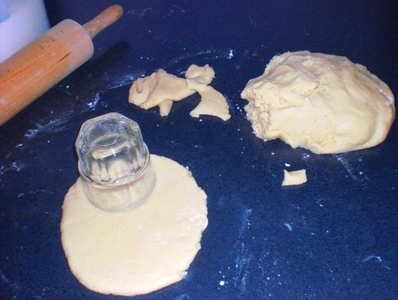
Photo 2: Ready for snacking!
This is one of our all-time favourite Saturday afternoon dinners. In Norwegian it is called “Makaroni og skinke grateng” - meaning “au gratin” as in covered with bread cumbs (not cheese this time) and browned. Tasty and quick to make - and the ingredients are all common things that we typically have in our fridge already. That means that lazy Hild and Rob didn’t have to make the 5 minute trip across the road to the 24 hour supermaket to buy anything special! So here we go - recipe kindly shared by Janet:
Ingredients (we divided the original recipe by 2 to feed two people)
- 60 grams macaroni
- 6 dl milk
- 1/8 teaspoon ground nutmeg
- 1/8 teaspoon ground pepper
- 1 egg
- 125 grams cubed ham, cubed bacon, or even better: cubed smoked lamb
- A sprinkle of bread crumbs
Directions
Cook macaroni in the milk until the macaroni goes soft. Hild was stirring constantly in fear of burning the milk, but this could be to excessive. We invite you to try without all the stirring… Then one was supposed to let the macaroni and milk cool down, but as usual Rob and Hild were not prepared to wait. So we mixed in the egg yolk, nutmeg, and pepper. If we had managed to find proper smoked lamb we would have used that, but we mixed in cubed bacon in stead. Then we should have whisked the egg white and folded it into the mix. But our mixer wasn’t cooperating so we just added a stirred egg white to the mix. The end results was OK but not as “fluffy” as it was supposed to be. We poured the mix into an oven proof dish (21 x 14 cm) and sprinkled bread crumbs on top. The dish went on the middle rack in the oven at 180 degrees Celsius for 40-45 minutes.
Afterthought: If we had whipped the egg white properly, we may have needed a bigger dish!
At home we used to serve this with melted butter and a salad. This time we didn’t feel like a salad so we had tomato ketchup in stead. It was nam nam. Hild forgot to take photos (sorry).
While we Norwegians typically only have kransekake at Christmas and big parties such as weddings and confirmations, a kransekake is a great cake for all occasions and it looks good to boot. We have experienced bringing it to parties and finding that no one was eating it because people thought it was a center piece for decoration only! So now we always explain to people at the start how to serve the cake to maintain its nice shape as it gets eaten. To para-phrase Joss Whedon: You eat it starting with its bottom (7th season of “Buffy The Vampire Slayer” mis-translation of the ominous warning “Desde abajo te devora” or “From beneath you it devours”).
Anyway, I digress and should get back to the recipe. Note that you’ll need special tins to make a traditionally shaped cake. If you don’t have the tins you will have to experiment with other shaped tins.
Ingredients (for one 18 rings high cake)
-
500 grams almonds (not roasted and with skins on)
-
500 grams icing sugar
-
3 table spoons plain flour
-
3-4 egg whites (one egg = ca. 50 gram)
-
Cooking spray
-
Semolina flour
-
Icing sugar and water mixture for assembling the cake
Directions
Grind the almonds in a hand driven or slow grinder. Warning: Fast speeds on normal kitchen machines makes for flat and non-chewy cakes. Mix ground almonds with icing sugar and flour. Add one egg white at a time until the dough so that you can roll it into a long “sausage”. It takes some practice to find the right thickness but you’ll have to make all 18 rings for the cake.
Spray the baking tins and dust them lightly with semolina flour. This will help you get the cakes out of the tins when they are done. Cut the rolled out dough to fill all 18 rings. Bake the rings/cake at 210 Celsius for 10-12 minutes. The rings should have a very light brown colour when they are done. Leave the rings in the tins until they have cooled off otherwise they’ll break when you try to remove them.
Mix icing sugar and water to a consistency that you can use piping bags to assemble the cake. Start with the largest ring, pipe icing sugar mix in a zig zag pattern around the ring, put the smaller ring on top and continue the process until the 18 rings have been assembled.
To store the cake, keep it in an airtight container. If it dries out, put a few slices of bread or halved raw potatoes in the container for a few hours with the cake. This will make it moist and chewy again. Make sure the bread or potatoes don’t touch the cake making it soggy. We also like to freeze left-over kransekake rings because they defrost in a few seconds in the micro wave and are very chewy afterwards.
PS: Rob still believes that all kransekaker should have 17 rings because you always eat the biggest/bottom ring to make sure that it is chewy and nice for the guests…
Some Photos:
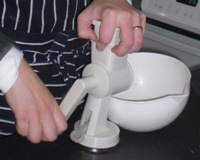
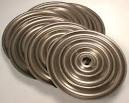
Photos: Grinding almonds by hand + special kransekake tins w/ 3 rings per 6 tins.
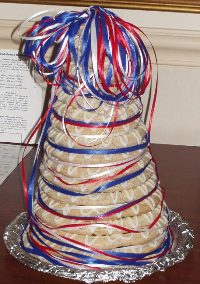
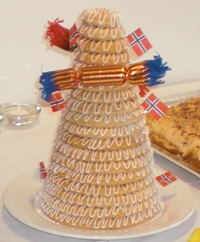
Photo: Cake decorated for a birthday - and one more traditional style for a confirmation.
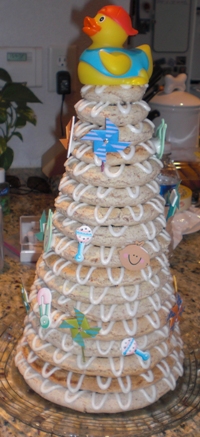
Photo: Cake decorated for a baby shower
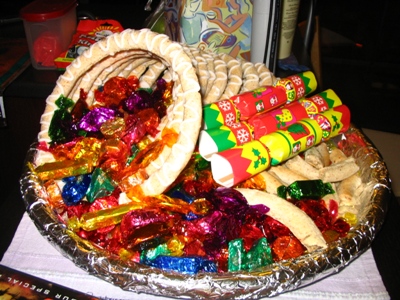
Photo: Cake decorated as a cornucopia with our favourite chocolates (Quality Street)