Posted by: Hild @ 8:32 am
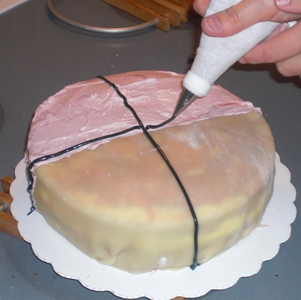
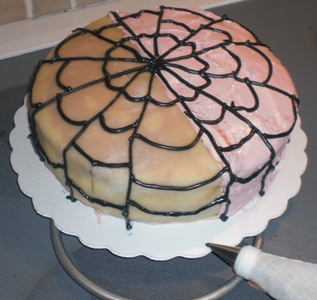
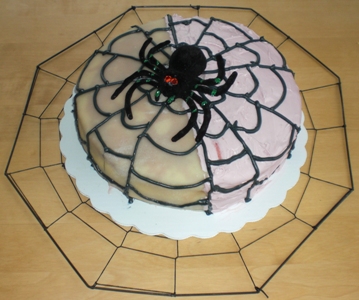
We love blautkake. This yummy Norwegian layer cake can be decorated for any special occasion and we had a Halloween party coming up. For us, a blautkake should have whipped cream filling and a marzipan cover. Hild had the idea that this time she wanted to make a half-and-half cake with a marzipan cover on one half of the cake and a more common (in North America) icing cover on the other half. The other part of the idea was to decorate it with a cobweb pattern and a huge big spider.
Note that “blautkake” translated directly from Norwegian means “soft cake” although Rob prefers to translate it as “soggy cake”. The soggier the better - to a point. Ho-hum.
Sponge Ingredients (for one 20 cm diameter cake with three layers):
- 4 large eggs
- 2 dl sugar
- 1 dl potato flour (I used corn flour and it turned out OK)
- 1 dl plain flour
- 2 teaspoons baking powder
- melted butter to grease the tin
Decorations:
- 2.5 dl whipping cream
- 1 dl Ribena juice (or more for more blood-effect. In Norway we would have used “husholdningssaft”)
- 1.5 dl seedless strawberry jam (or more for more blood-effect)
- 2.5 dl mandarin wedges in fruit juice (or more for more bits-of-brain-effect)
- 100 gr marzipan (200 gr for complete cake cover)
- 2 dl ready-made spreadable icing (or double the amount if you do not plan for a marzipan cover)
- 2 dl icing sugar
- food and icing colouring (yellow and black would be best for our party but we only had red and black)
Directions:
Pre-heat the oven to 200 celsius. Whisk eggs and sugar until it thickens. Carefully fold in a mix of potato flour, flour, and baking powder. Fold for an even mix but as little as possible. Melt butter and grease the tin (or use any other way of greasing the tin). Pour the mix into the tin and place it on the middle oven rack. Bake it for 25-35 minutes until it is ligth brown on the outside and baked through. Leave the cake to cool for a few minutes and remove it from the tin. When the cake has cooled down, cut it into three even layers.
This is when one can try different things to decorate the cake evey time. We prepared our layers like this:
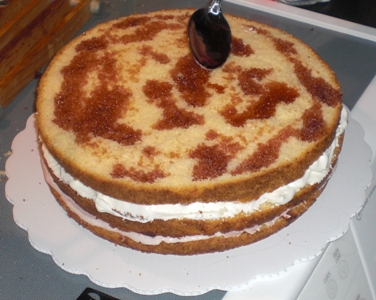
- Douse the bottom layer with Ribena. We should have used more to make the cake look more “bloody” for Halloween. Whip the cream until it thickens. Cover the layer in a mix of some of the whipped cream and strawberry jam.
- Put the second layer on top of the cream/jam layer. To make the middle layer moist, douse it with juice from the mandarins. Spread whipped cream on this layer, spread a layer of mandarin wedges and another layer of whipped cream.
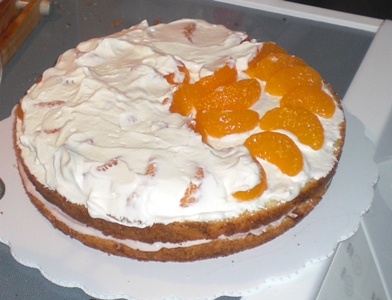
- Put the top cake layer on and douse it with Ribena. Spread strawberry jam over the layer and another layer of whipped cream before covering the cake with marzipan. We only covered half the cake in marzipan. On the other half we spread the ready-made icing (vanilla flavour with some of our own red colouring. If we had had yellow colouring we could have gotten a more fun orange Hallween colour).
To make the cobweb effect we mixed icing sugar with black food colouring and some water. Note of caution: don’t overdo the colouring unless you want your guests to go home with black mouths and lips! We had planned to find an edible chocolate spider for extra decoration, but we weren’t able to find one. So the one in the final photos below is fake fake fake. The cake was definitely nam nam. Keep in mind that leaving any left-over cake covered in the fridge overnight does NOT make it any less nam nam!
Photos:
1. Dousing the second layer
2. Mandarins in the second layer
3. Dousing the top layer
4. Cobweb icing on marzipan and icing top
5. Finished cobweb icing
6. Spider guarding the cake.
While we Norwegians typically only have kransekake at Christmas and big parties such as weddings and confirmations, a kransekake is a great cake for all occasions and it looks good to boot. We have experienced bringing it to parties and finding that no one was eating it because people thought it was a center piece for decoration only! So now we always explain to people at the start how to serve the cake to maintain its nice shape as it gets eaten. To para-phrase Joss Whedon: You eat it starting with its bottom (7th season of “Buffy The Vampire Slayer” mis-translation of the ominous warning “Desde abajo te devora” or “From beneath you it devours”).
Anyway, I digress and should get back to the recipe. Note that you’ll need special tins to make a traditionally shaped cake. If you don’t have the tins you will have to experiment with other shaped tins.
Ingredients (for one 18 rings high cake)
-
500 grams almonds (not roasted and with skins on)
-
500 grams icing sugar
-
3 table spoons plain flour
-
3-4 egg whites (one egg = ca. 50 gram)
-
Cooking spray
-
Semolina flour
-
Icing sugar and water mixture for assembling the cake
Directions
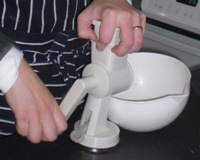
Grind the almonds in a hand driven or slow grinder. Warning: Fast speeds on normal kitchen machines makes for flat and non-chewy cakes. Mix ground almonds with icing sugar and flour. Add one egg white at a time until the dough so that you can roll it into a long “sausage”. It takes some practice to find the right thickness but you’ll have to make all 18 rings for the cake.
Spray the baking tins and dust them lightly with semolina flour. This will help you get the cakes out of the tins when they are done. Cut the rolled out dough to fill all 18 rings. Bake the rings/cake at 210 Celsius for 10-12 minutes. The rings should have a very light brown colour when they are done. Leave the rings in the tins until they have cooled off otherwise they’ll break when you try to remove them.
Mix icing sugar and water to a consistency that you can use piping bags to assemble the cake. Start with the largest ring, pipe icing sugar mix in a zig zag pattern around the ring, put the smaller ring on top and continue the process until the 18 rings have been assembled.
To store the cake, keep it in an airtight container. If it dries out, put a few slices of bread or halved raw potatoes in the container for a few hours with the cake. This will make it moist and chewy again. Make sure the bread or potatoes don’t touch the cake making it soggy. We also like to freeze left-over kransekake rings because they defrost in a few seconds in the micro wave and are very chewy afterwards.
PS: Rob still believes that all kransekaker should have 17 rings because you always eat the biggest/bottom ring to make sure that it is chewy and nice for the guests…
Some Photos:
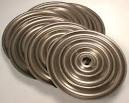
Photos: Grinding almonds by hand + special kransekake tins w/ 3 rings per 6 tins.
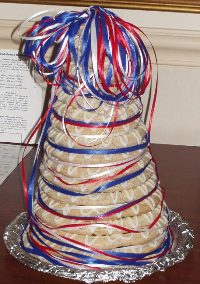
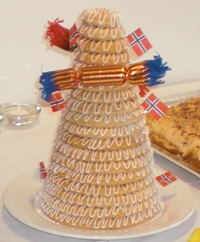
Photo: Cake decorated for a birthday - and one more traditional style for a confirmation.
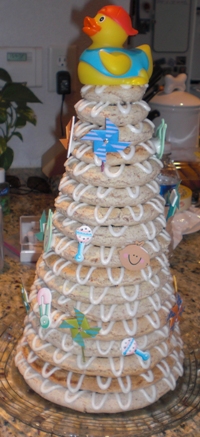
Photo: Cake decorated for a baby shower
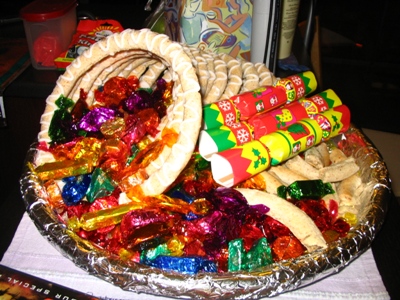
Photo: Cake decorated as a cornucopia with our favourite chocolates (Quality Street)
Ingredients - dough:
-
60 grams yeast (or one bag of dried yeast)
-
500 grams plain flour
-
1/2 teaspoon ground cardamomme
-
90 grams sugar
-
125 grams melted butter
-
3 and 3/4 dl luke-warm skim milk
Ingredients - filling: soft margarine/butter spread; sugar; cinnamon; and raisins
Mix yeast, some sugar, and a little luke-warm water in a small bowl. Leave this to stand until it becomes frothy. Mix flour, cardamomme, and sugar in a bowl. Add melted butter, 3 dl of the luke-warm milk, and the yeast mixture to the bowl. Mix well and add more milk or flour until the dough is firm but still a bit sticky.
Leave dough in a warm place with no draft for at least 30-60 minutes until it has risen to twice its size.
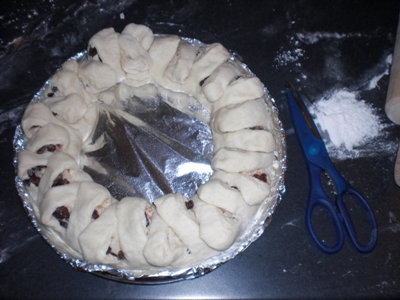
Use a rolling pin to roll out the dough to a layer that is as long as you want the Kringle to be and less than 1/2 cm thin. Spread some soft margarine/butter spread and sprinkle sugar cinnamon and raisins. Roll the dough as shown on the photo and place it in a circle on the baking sheet. Starting at one end, use a pair of scissors to cut 1-2 cm wide wedges and fold to the left and right all around the circle to make the garland pattern.
Leave the Kringle to rise for 30 minutes then brush some milk over the surface. Bake in the middle of the oven at 190 celsius for 30-40 minutes. Once it has coooled down, brush a thin layer of icing over the Kringle. - then enjoy!
Janet (Hild’s mum) keeps telling us that left-overs keep really well in the deep freezer and a short time in the microwave does the trick when you need a snack one day. We, however, have no idea if it works because we haven’t had any left-overs yet!!
Some photos:
Photo: Rolling out the dough…. (Doing it again, I would have rolled it thinner/wider to get more cinnamon-swirls in the final product)
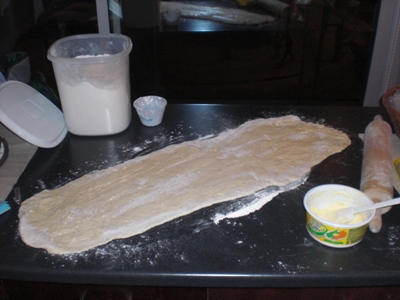
Photo: Cake ready for cutting the garland-pattern
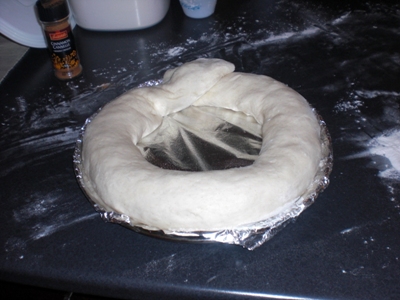
Photo: Cake with garland-pattern ready for baking.
Sorry - no after-baking photo as we ate it before we got the camera out!
Ingredients:
-
4 oz butter/margarine
-
4 oz sugar
-
2 eggs
-
4 oz plain flour + 1 ts baking powder (or 4 oz self rasing flour)
-
2-3 drops of vanilla essence (or 1 ts vanilla sugar)
-
Directions:
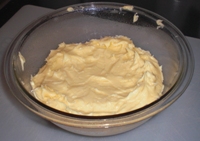
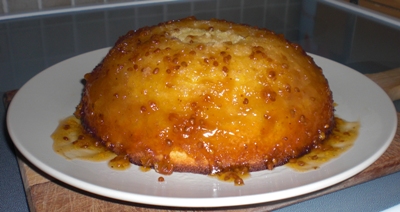
Spray the oven proof bowl and add a few spoons of your choice of jam or syrup
Cream butter and sugar. Beat inn eggs. Gradually add flour/baking powder. Do not mix or beat dough too much. Stir in 2-3 drops of vanilla essence. Add a little bit of water to make the consistency such that it falls off the spoon.
Pour dough over the jam/syrup. Spread the dough to form a dip in the middle of the bowl as it will rise more there than along the edges.
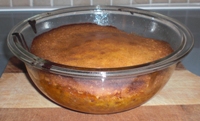
Normally we would then steam it in a large pan for 1.5 hours. Today we were peckish and needed quicker results. So we baked it at 160 celsius for 50 minutes.
Ingredients:
-
1 litre butter milk
-
5 dl sour cream
-
1/2 kg sugar
-
2 ts baking powder
-
2 ts bicarbonate of soda
-
1.5 kg plain flour
Directions:
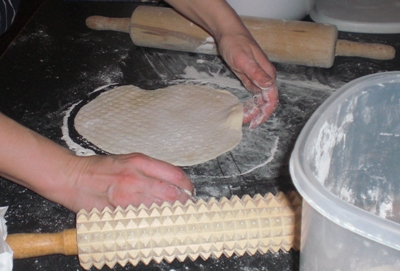
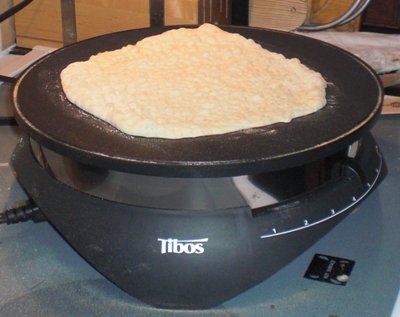
Mix all milk, sour cream, ingredients and add enough flour for a dough good for rolling into thin lefser. Divide the dough into pieces large/small enough to fit your “takke”/crepe maker. Roll the pieces thinly according to your own preference. If you have a knobbly rolling pin in addition to the smooth one, you can use it to get the traditional surface pattern and texture (see picture below).
Traditionally the dough should be rolled to 2-3 millimetres thin lefser and baked quickly on the “takke”. However, it is also quite nice to make them thicker especially if you will eat them immediately after baking them (they become soft and delicious). Given our usual impatience we typically end up with the thicker ones!
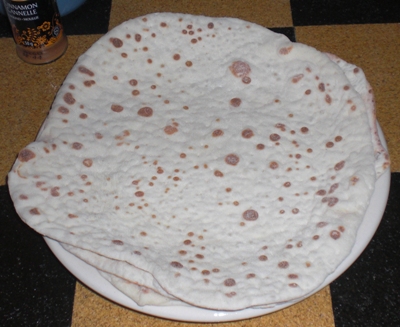
Traditionally we would dry the thin lefser out after baking them and they would keep well in a cool dry place. Then at a later stage, when you want to eat them, you moisten them under the water tap and leave them between two pieces of cloth until they are soft again.
Whether you eat them now or later, spread with butter/margarine and sprinkle with sugar and cinnamon. Hild will eat this with anything yummy including brunost (Norwegian goat cheese)! Try different things and see how it tastes.