Recipe feeds 6 normal people or 4 very hungry people
“Pino” (ground beef filling)
Ingredients:
- 500 grams ground beef (low fat is best)
- 3 onions (see note 1)
- 3 cloves of garlic
- A little bit of cooking oil
- Salt and cumin to taste
- Raisins, soaked in hot water
- Olives
- 2 hard-boiled eggs, divide each egg into 4 segments
- 6 small pieces of chicken
Preparation:
- Chop onion and garlic finely.
- Heat a little oil in a frying pan; add the onion and garlic and fry for a few minutes.
- Add the ground beef to the frying pan and cook over low heat until the meat is no longer red. Stir regularly.
- Add salt and cumin to taste. (see Note 2)
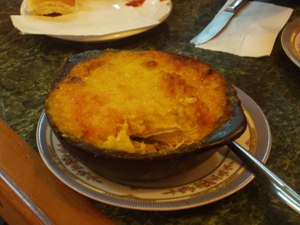
- Put the prepared “pino” in an oven proof dish.
- Boil the chicken in water with salt and some herbs such as bay leaves or other herbs you have on hand.
- In your mind, divide the ovenproof dish into desired portions sizes (for instance six if you have six portions for chicken – but you can make each portion smaller or larger as you wish) and within the (imagined boundaries of each) portion place a piece of chicken together with a piece of egg, an olive and some raisins.
- Next – prepare the corn paste.
———
Corn Paste Topping
Ingredients:
- 6 fresh ears of corn or 2 cans of corn (see note 3)
- Several leaves of fresh basil (see note 4)
- Sugar
Preparation:
- Remember to pre-heat the oven to 200 °C (see note 5)
- If using fresh corn, carefully cut the corn from the cob.
- If using cans of corn and the can has a lot of liquid in it, let it drain.
- Put the corn and the basil in a blender and puree the mix.
- If you used fresh corn, you need to put the corn and basil mix in a pan and let it simmer on low heat for a few minutes. You can skip this step if you use canned corn as that corn has already been cooked.
- Place the corn paste on top of the “pino“, chicken, olives, egg and raisins that you previously placed in the ovenproof dish.
- Spread the corn paste evenly to make a pretty cover for the dish. Sprinkle with some sugar to help give it a prettier color after baking.
- Put the dish in the oven and cook till the corn starts to brown on the top and around the edges. Remember that all ingredients have already been fully cooked, so you are really just warming it up and making the flavors mix together.
Notes and Comments:
Note 1 – I am not a fan of a lot of onion so I use about one onion and lots of green onions (spring onions) instead as they have a gentler flavor, but this depends on your own preferences.
Note 2 – Sometimes I also add paprika powder to give the “pino” a nicer color.
Note 3 – The recipe calls for 2 cans of corn. The cans in Chile are much larger than in Norway and I would recommend using at least 4 Norwegian sized cans. I love the corn paste topping so the truth is I usually use even more corn than that, but once you try the recipe you will figure out how much corn you prefer to use. There should be enough corn paste to at least cover the “pino”, chicken, eggs etc…
Note 4 – The taste will be best if you can use fresh basil for this recipe, but I know that may be hard to find in Norway so then you can use the dry basil (basilikum) that they sell in the herb and spice section of the supermarket.
Note 5 – The oven temperature may vary depending on the oven. It should be quite high, but if it starts burning, try a lower temperature such as 180 °C.
General comments: If you do not like the raisins or olives, these can be left out. You can also reduce the amount of garlic if your guests do not care much for garlic. Also, the Chileans will normally have pieces of chicken in this dish but this can also be left out if you prefer a simpler version. The Chilean food is generally not spicy, but if you want to add some “kick” to the dish you can definitely add a little chili powder, but not too much because it would overpower the sweet flavor of the corn.
Posted by: Hild @ 6:53 pm
After a mini-holiday skiing in Mont-Tremblant, Quebec, we were inspired to buy a crepe maker. We were inspired after having two meals at Crêperie Catherine - dinner one day and returning the next day for dessert. We had front-row seats to see how the crepes were made in their little kitchen. To a Norwegian, a crepe maker is simply a small “takke” on which we make lefse (see recipe for hardangerlefse). We also predict many other uses for a crepe maker including making quesadillas or simply warming up tortillas filled with all sorts of goodness. That would be more interesting than sandwiches, for sure!
Crepe ingredients - Alternative 1 (UK/Delia crepes):
-
6 oz plain flour
-
a pinch of salt
-
2 large eggs
-
7 fl oz low-fat milk
-
3 fl oz water
Crepe ingredients - Alternative 2 (crepe recipe - came witht he crepe maker):
-
2 1/4 cup flour
-
1 teaspoon salt
-
(1 tablespoon sugar)
-
1 egg
-
1 cup water
-
1 1/3 cup low-fat milk
Crepe ingredients - Alternative 3 (Norwegian pannekaker):
-
ca. 3.5 dl flour
-
2 eggs
-
6 dl low-fat milk
-
1 teaspoon salt
-
(1-2 teaspoons sugar)
-
(1 tablespoon margarine or butter)
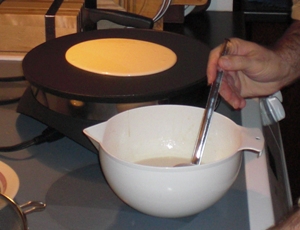
Mix the eggs, milk and water gradually to the flour and salt.
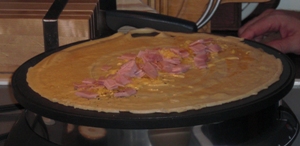
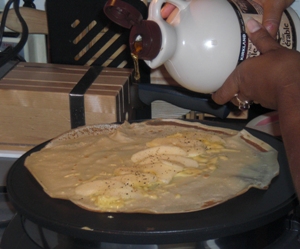
Avoid getting a lumpy batter. If you are unlucky (like we frequently are), simply strain the batter before cooking the crepes. Heat up the crepe maker (our brand needs mark 4-5). Put sufficient amount of batter to the middle of the crepe maker and use a crepe-scraper to spread the batter in a smooth and circular motion. We are still applying the trial-and-error method to determine how much batter and how to spread it evenly…. simply eat the errors. Cook the crepe 10-15 seconds on each side. Flip the crepe back to the first side and add filling as you like.
Some of the crepe fillings that we’ve tried:
-
Sliced/chopped ham, grated swiss cheese, a dash of maple syrup, freshly grated pepper
-
Peeled/sliced sweet apples, thinly sliced brie, a dash of maple syrup, freshly grated pepper
-
1 beaten egg, sliced/chopped ham, grated cheese
-
Ricotta cheese, handful of fresh baby spinach, freshly grated pepper
-
Ricotta cheese, peeled/sliced sweet apples, a dash of maple syrup (this one got a bit too soggy!)
-
Italian meatballs, fresh mozzarella cheese, tomato sauce (e.g. Prego)
-
Slices of steamed salmon, peas, sweet corn, tzatziki sauce
-
We haven’t tried sweet ones yet, but we’re picturing chocolate sauce, bananas, berries, manchar…. nam nam
We prefer to put the filling in the middle of the crepe and fold in the sides twice to make an envelope. This crepe-envelope can be flipped over and cooked/heated on both sides. For easy taste testing with family and friends we have loaded the filling down the middle of the crepe and folded over once to slice it up in several pieces.
I’m sure we’ll think of more ways of doing this as just about everything we eat now ‘goes’ past the crepe maker!!!
Some photos: (1) Rob adding batter to the crepe maker. (2) Ham and cheese filling. (3) Apple, brie and maple syrup
OK, I confess! I went a little overboard a while ago trying out different liver pâté recipes. In total I made three different batches of pâté using two different recipes and different mixes of beef and chicken liver. To be honest with you - after having worked with the liver (not the greatest thing to touch!) and with its “special” aroma – I was not even sure that I wanted to taste the pâté any longer. Fortunately it had to cool down in the fridge overnight – and the next day I was ready to dig in!
The first recipe comes from Allers, but I changed it just a little – not sure if it was for better or for worse…..
Hjemmelaget Leverpostei (Homemade liver pâté)
1. Cut 500 gr liver in cubes and poach in boiling water for 3 minutes. The recipe called for pork liver but I could not find it in the stores near our house. So instead I used beef and chicken liver. I made one batch with only beef liver and another batch with about half and half of beef and chicken liver.
2. Put the poached liver along with the following ingredients in a bowl and mix just a little with a large spoon.
· 100 gr vegetable shortening (the recipe said 250 gr but I thought that was way too much)
· Half small onion, chopped
· 2 to 3 anchovies (I think I put more than that!)
3. Grind the above mix in the meat grinder. Once for coarser pate (which is what did) or twice if you want a finer pate.
4. Add the following ingredients to the ground liver mix and mix well:
· 2 tbs olive oil
· 1 dl flour
· 2 eggs (whole)
· 2 dl heavy cream
· 2 tsp salt
· Plenty of freshly ground pepper
· ½ tsp ground ginger
· 1 tsp thyme (I used fresh thyme)
5. Preheat oven to 175°C (approximately 340° F).
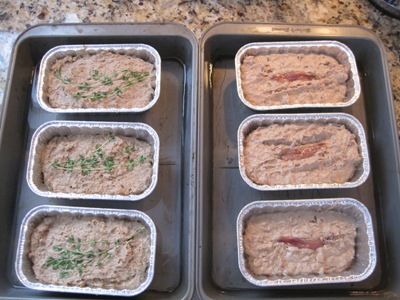
6. Put liver mixture in small oiled loaf tins and decorate with thyme sprigs or pieces of anchovy. I used some small aluminum tins I found at the store. They have lids that I think will be good for storage.
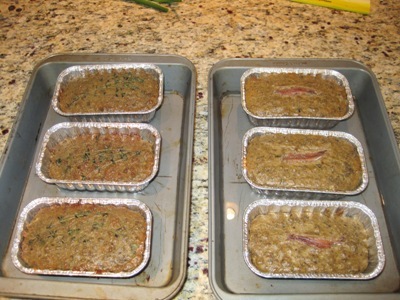
7. Cook in oven in a water bath for about one hour till the internal temperature is 76°C. It took 55 minutes in my oven to reach this temperature.
8. Let the pâté cool down in the forms.
9. The original recipe indicated that the pâté can be frozen. If it is edible and we do not eat it all at once, I will try to freeze it and I will let you know later on how that turns out.
Before the oven:
After the oven:
Pâté Poulet
This was a recipe I found in the Crème de Colorado Cookbook, but once again I made some modifications and I have to take all the blame for the potential disastrous result. I prepared this recipe last and as you can see the trend is obvious… measurements did not matter as much at this stage…..it was all done “al ojo”.
1. In a large pan sauté the following ingredients until the liver is just done. I have no idea when the liver is “just done” so I may have overcooked it….. ugh! It was definitely not raw.
· About 2 pounds chicken liver
· Green onions, about a cup
· Plenty of butter
· A generous amount of fresh thyme
2. Add the following ingredients to the mix:
· ½ cup butter, cut into pieces that will fit in the meat grinder
· 4 slices of bacon, browned and chopped
· A bunch of anchovies (probably 4 to 5 pieces)
3. Grind the mix in the meat grinder (or food processor).
4. Reduce ½ cup sherry to about ¼ cup in a small saucepan and add to the ground liver mix.
5. Add the following to the ground liver and mix well:
6. Add salt. The recipe suggested ½ tsp, but at this stage I was just doing it “al gusto” so who knows how much I added.
7. Stir in heavy cream till the consistency looks right! …..coming from the one who has always complained about the Chilean recipe books that are not specific about measurements….{eye roll}.
8. This recipe filled four small oiled loaf tins which I decorated with chopped green onions. I left the tins in the fridge overnight to chill and firm.
The Tasting
Alvaro and I apparently have the same taste in liver pâté. We both preferred the beef liver version with the mixed beef and chicken next. Neither of us cared much for the chicken liver only version of the pâté, but that is probably because we prefer the coarser pâté and for some reason the chicken liver turned out very fine. Both Valeria and Nibaldo only liked the chicken liver pâté. I guess we have some for all tastes!
We had lots of leftovers which were frozen for future use and we will update you on how it tastes after defrosting.
Let us know if you are able to come up with improved versions of the liver pâté recipes. We love pâté and nothing is better than home made with all pronounceable ingredients.