Posted by: Hild @ 6:03 pm
Initially our plan was to make calzone pizza, but then we remembered last time we made those. We made way too big calzones and ate them all…. piglets. So here is an option for a smaller dinner - maybe…
Ingredients (see also ‘Skulebrød’ - http://namnam.rygnestad.net/?p=28)
Dough for 6 horns:
- 20 grams butter (could also use 1/4 dl oil)
- 2.5 dl water (could also be milk)
- 1 rounded teaspoon dry yeast
- 1/2 teaspoon salt
- 1 teaspoon sugar
- ca. 6-7 dl of plain flour
- A little bit of milk for brushing
We like to not fill 2 horns and keep them for “afters” so - Filling for 4 horns (use whatever you’d like):
- 1/2 canned ham = 225 grams - chopped
- 3 rings of pineapple - drained well
- 1/4 red pepper - chopped
- 1/4 yellow pepper - chopped
- 12 table spoons cottage cheese (3 per horn) - drained well
Directions:
Follow the directions from ‘Skulebrød’ until the dough has risen once to approximately twice its original size. Divide the dough in two halves and roll it out. Cut three triangles from each half. Put some ham, pineapple, pepper, and cottage cheese at the wide end of each triangle. Fold the corners of each triangle around the filling and roll it up toward the pointy end of the triangle. [I know that this is cryptic - but the end result should look like a horn…]
Put the horns on a baking tray covered in aluminium foil and/or sprayed with oil. Cover the horns with a tea-towel and leave them to rise another 10-15 minutes. Turn on the oven and set it to 225 celsius. Bake the horns for 20-25 minutes in the middle of the oven.
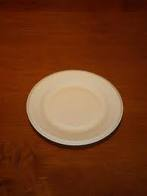
Before serving, leave the horns on a rack to cool down. We ate them too soon and burned our mouths.
[This is where I would have added before- and after-photos, but the shutter speed on our camera is no match for Rob’s hunger. The horns were all gone before I could get a photo…. see: here is the empty plate!!]
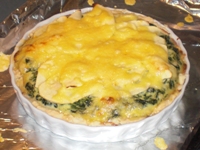
Most evenings when we realise that it is dinner time we just make sandwiches, something we’ve been told is very boring. This is true, so last week we were inspired to explore the fridge and see what needed eating and whether they added up to a meal. We ended up with a quiche - a standard way of eating left-overs!
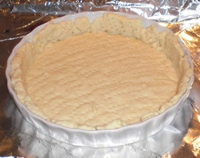
Pastry:
-
4 oz plain flour
-
1 oz lard
-
1 oz butter
-
a little bit of salt
-
cold water to mix (4-5 tablespoons)
Preheat oven to 180 Celsius. Mix all ingredients and knead the dough enough for it to be rolled out (not any longer). Roll the pastry thin enough to line the quiche dish (ours was 19cm in diametre). Bake it in the oven for 20 minutes
Filling (approximate as it was whatever we had left in the fridge!):
-
400 gr spinach
-
Some butter
-
1 dl ricotta cheese
-
1 dl sour cream
-
2 beaten eggs
-
salt + pepper + 1/2 grated nutmeg [thanks to Rob for reminding me about this in his comment]
Cook the spinach in the butter. Add the remaining ingredients and cook for a while longer. Add the filling to the baked pastry. Bake quiche for another 10 minutes.
Topping:
-
1 apple (sweet rather than tart)
-
1 dl grated Swiss cheese
-
some grated parmesan
Peel and slice the apple into thin slithers. Cover the quiche in apples and grated cheese. Bake quiche for another 10 minutes or until the cheese is light brown.
Posted by: Hild @ 6:53 pm
After a mini-holiday skiing in Mont-Tremblant, Quebec, we were inspired to buy a crepe maker. We were inspired after having two meals at Crêperie Catherine - dinner one day and returning the next day for dessert. We had front-row seats to see how the crepes were made in their little kitchen. To a Norwegian, a crepe maker is simply a small “takke” on which we make lefse (see recipe for hardangerlefse). We also predict many other uses for a crepe maker including making quesadillas or simply warming up tortillas filled with all sorts of goodness. That would be more interesting than sandwiches, for sure!
Crepe ingredients - Alternative 1 (UK/Delia crepes):
-
6 oz plain flour
-
a pinch of salt
-
2 large eggs
-
7 fl oz low-fat milk
-
3 fl oz water
Crepe ingredients - Alternative 2 (crepe recipe - came witht he crepe maker):
-
2 1/4 cup flour
-
1 teaspoon salt
-
(1 tablespoon sugar)
-
1 egg
-
1 cup water
-
1 1/3 cup low-fat milk
Crepe ingredients - Alternative 3 (Norwegian pannekaker):
-
ca. 3.5 dl flour
-
2 eggs
-
6 dl low-fat milk
-
1 teaspoon salt
-
(1-2 teaspoons sugar)
-
(1 tablespoon margarine or butter)
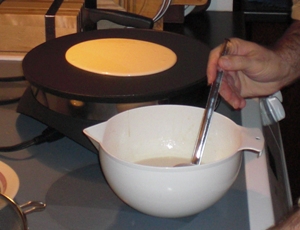
Mix the eggs, milk and water gradually to the flour and salt.
Avoid getting a lumpy batter. If you are unlucky (like we frequently are), simply strain the batter before cooking the crepes. Heat up the crepe maker (our brand needs mark 4-5). Put sufficient amount of batter to the middle of the crepe maker and use a crepe-scraper to spread the batter in a smooth and circular motion. We are still applying the trial-and-error method to determine how much batter and how to spread it evenly…. simply eat the errors. Cook the crepe 10-15 seconds on each side. Flip the crepe back to the first side and add filling as you like.
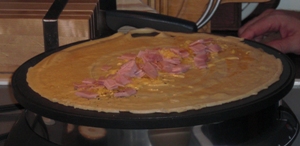
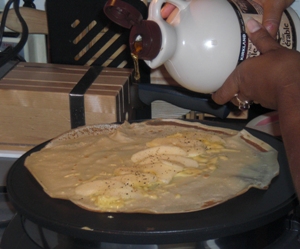
Some of the crepe fillings that we’ve tried:
-
Sliced/chopped ham, grated swiss cheese, a dash of maple syrup, freshly grated pepper
-
Peeled/sliced sweet apples, thinly sliced brie, a dash of maple syrup, freshly grated pepper
-
1 beaten egg, sliced/chopped ham, grated cheese
-
Ricotta cheese, handful of fresh baby spinach, freshly grated pepper
-
Ricotta cheese, peeled/sliced sweet apples, a dash of maple syrup (this one got a bit too soggy!)
-
Italian meatballs, fresh mozzarella cheese, tomato sauce (e.g. Prego)
-
Slices of steamed salmon, peas, sweet corn, tzatziki sauce
-
We haven’t tried sweet ones yet, but we’re picturing chocolate sauce, bananas, berries, manchar…. nam nam
We prefer to put the filling in the middle of the crepe and fold in the sides twice to make an envelope. This crepe-envelope can be flipped over and cooked/heated on both sides. For easy taste testing with family and friends we have loaded the filling down the middle of the crepe and folded over once to slice it up in several pieces.
I’m sure we’ll think of more ways of doing this as just about everything we eat now ‘goes’ past the crepe maker!!!
Some photos: (1) Rob adding batter to the crepe maker. (2) Ham and cheese filling. (3) Apple, brie and maple syrup